

Get Started with Google Docs
Accessing Google Docs and creating, editing, and sharing documentsGoogle Docs 접속하기, 새문서 작성, 편집, 그리고 문서 공유하기
Access your documents
문서에 접속하기To create a new document and to view a list of documents that you own or can edit:
새 문서를 만들기 위해서, 그리고 여러분이 소유하고 있거나 편집권한이 있는 문서 목록을 보기:
- Directly visit the page
- 페이지를 직접 열기
Enter https://docs.google.com/a/<<YOURDOMAIN>> into your browser. <<create link>>
예를 들면, 도메인이 sbctech.net이라면 https://docs.google.com/a/sbctech.net 으로 접속
문서도구 URL은 관리자가 CNAME 변경을 통해서 간편하게 설정할 수 있습니다.
( 예: https://docs.google.com/a/sbctech.net → https://docs.sbctech.net )
- Or, visit from another Google Apps product
- 혹은 다른 Google Apps서 제품에서 상단 링크를 통해 접속하기
When you're using a Google Apps product (e.g. Mail, Calendar), you'll see other Apps products listed at the top left of the page. Simply click Documents to access your sites list.
Google Apps 제품을 사용하고 있다면(Gmail이나 캘린더), 화면 좌측 상단에 서비스 목록이 나타날 것입니다. 문서도구를 클릭하면 바로 접근하실 수 있습니다.

In your Docs list, you'll see all of the documents, presentations, and spreadsheets that you have access to.
문서도구 목록을 보면, 여러분이 접근권한을 가지고 있는 문서, 프리젠테이션, 그리고 스프레드시트 등이 보이실 겁니다.
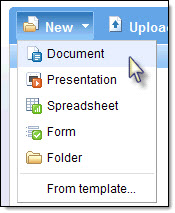
Create a document
새문서 만들기Once you've accessed your Docs List, click the New drop-down menu and select Document create a new document.
일단 문서도구 목록에 접속을 했다면, 새 문서를 만들기 위해서는 새로 만들기 drop-down 메뉴를 클릭하여 문서를 선택합니다.
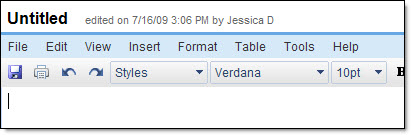
An untitled document will appear in your browser -- now you're ready to edit!
제목없음 문서가 여러분의 브라우져에 보이실 겁니다. -- 이제 편집할 준비가 되었습니다.!
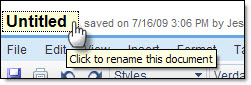
Rename your document
문서 이름 변경하기Click on the title to rename the document.
문서 이름을 변경하려면 제목 부분을 클릭하십시오.
Edit and format your document
문서 편집과 구성하기There are many ways to edit your document with the edit toolbar.
편집 툴바를 이용하여 문서를 편집하는 방법은 여러가지가 있습니다.
You could stick to entering plain text, but why? Take advantage of the full range of features in Google Apps Documents to make your documents stand out from the rest.
여러분은 단순히 텍스트 만을 사용할 지 모르지만, 좋은 문서를 만들기 위해서 Google Apps 문서의 모든 기능을 사용해 보시기 바랍니다.
To get you started, here are a few ideas:
그러기 위해서는 여기 몇가지 아이디어가 있습니다.
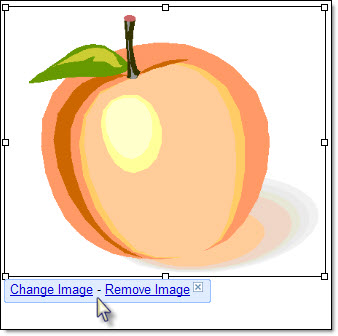
Insert images
이미지 삽입
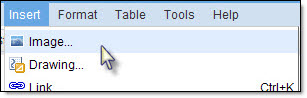
Choose an image from your computer or from the web (via URL). Once your image is added, you'll be able to modify or remove it at any time.
여러분의 컴퓨터에 있는 이미지, 혹은 웹상의 이미지 (URL을 통한)를 선택하여 삽입할 수 있습니다. 이미지가 추가되면 필요시 수정이나 제거가 가능합니다.
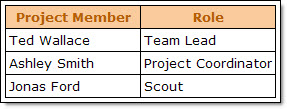
Add a table
테이블 삽입

Tables are a great way to organize information within your document. Start by choosing the number of rows and columns and then begin to format your table.
테이블은 문서를 작성하는데 있어서 훌륭한 방안이 될 수 있습니다. 원하는 행과 열 수를 선택하여 테이블을 꾸며보시기 바랍니다.
Share and collaborate
공유와 협업Once you've created your document, share it with others! Collaborators will be able to edit the same document at the same time -- you'll always have the most up-to-date version at your fingertips.
문서를 작성하고 나서, 다른 사람과 공유해보시기 바랍니다. 공유를 받은 사용자는 동시에 동일한 문서를 편집할 수 있습니다 -- 이제 여러분은 항상 최신버전을 사용하고 있게 됩니다.To get started, click the Share button at the top right of the page.
공유를 사용하기 위해서는, 페이지 우측 상단에 공유 버튼을 클릭합니다.
You have the following options:
그러면 다음과 같은 옵션이 나타납니다.
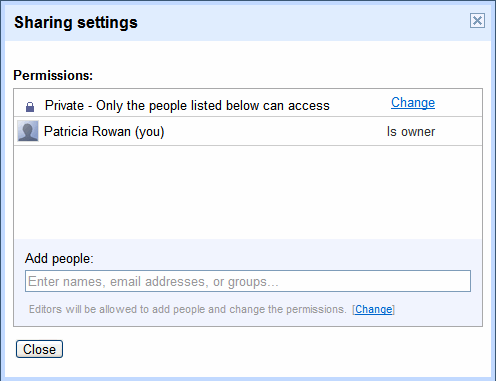
Permissions
권한
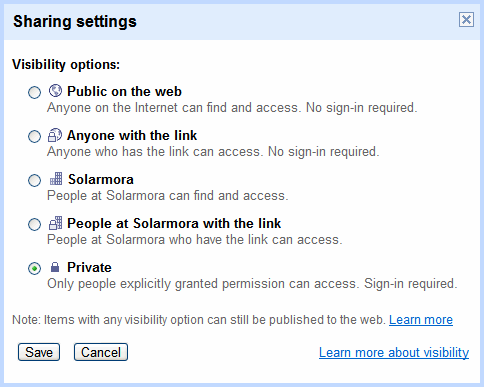
Sharing the link to your document is another way to allow others to view or collaborate on your content. To set the sharing permissions, click Change under Permissions. You’ll see this list of settings:
작성한 문서의 링크를 타인과 공유한다는 것은 다른 이가 여러분의 문서를 보게 하거나 함께 협업을 할 수 있게 해주는 방법이기도 합니다. 공유권한을 설정하기 위해서는 권한 아래 변경을 클릭합니다. 공유설정 목록이 나타납니다.
Add people
공유자 추가
Share your document with specific individuals and determine their level of access.
특정 사용자와 문서를 공유하십시오. 그리고 접근수준을 결정하십시오.
- Can edit: Collaborators can add and edit content in your document.
- 편집 가능: 공유된 사용자는 여러분의 문서에 추가 혹은 편집을 할 수 있습니다.
- Can view: Individuals can access a read-only version of your document. They won't be able to edit any content in your document.
- 보기 가능: 공유된 각 개인은 여러분의 문서에 읽기 전용 모드로만 접근할 수 있습니다. 그들은 어떠한 내용도 편집할 수 없습니다.
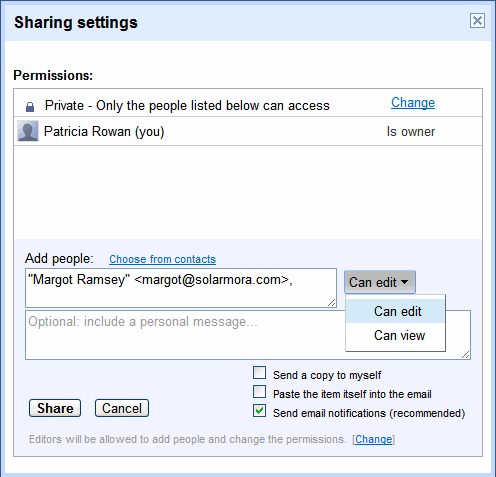
You'll have the option to send an invitation (in email message format) to view or edit your document.
여러분의 문서를 타인과 함께 보거나 편집하기 위해서 이메일 알림 보내기(권장) 옵션 을 통해 공유할 사용자에게 초대메일을 발송할 수 있습니다.
See who has access
접근가능한 사용자 보기
To see who has access to your document, including their permission levels, simply click the Share button. Keep in mind that you can also alter permission levels here.
해당 문서에 접근가능한 사용자와 각각의 접근레벨을 보기 위해서는 공유 버튼을 클릭하시면 됩니다.
여러분도 이 사용자 목록에 포함되어 있음을 확인하시기 바랍니다.

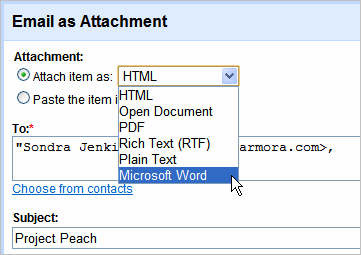
Email as attachment
이메일에 첨부하기
Send your document to individuals inside or outside of your domain by emailing it as an attachment: Click the down arrow to the right of the Share button, and then choose Email as attachment.
문서를 이메일로 첨부하여 내부사용자나 혹은 외부 사용자에게 발송하여 보십시오.: 공유 버튼 우측의 down-arrow를 클릭한 후 이메일에 첨부하기를 선택합니다.
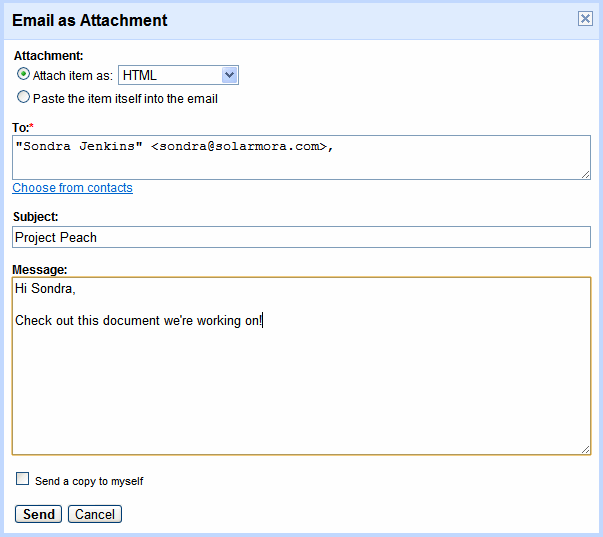
You can decide the format of the attachment (e.g. Microsoft Word Document, Rich Text Format, etc.) and customize the email message they will receive:
첨부파일의 포맷을 설정할 수 있으며 (예를 들면, Microsoft Word나 리치텍스트 포맷, PDF 등) 상대방이 받게 될 메일 내용을 편집할 수 있습니다.
Publish as web page
웹에 게시
Publish your document as a web page and others can access and view it online. Your document will be assigned a unique address (URL) that you can send to your friends and colleagues.
누구나 문서에 접근하고 온라인으로 열람할 수 있도록 문서를 웹에 게시할 수 있습니다. 해당 문서는 고유 URL을 가지게 되며 친구나 동료에게 공유하면 열람할 수 있게 됩니다.

To print your document, select File > Print
문서인쇄를 하려면 파일 > 인쇄를 선택합니다.
A PDF version of your document will appear along with the print dialog box.
인쇄하려는 문서의 PDF 포맷이 인쇄 대화상자에 나타나게 됩니다.
No comments:
Post a Comment