

Get Started with Sites
Accessing Sites and creating, editing, and sharing a site
사이트 접속, 작성, 편집, 공유Access Sites
사이트 접속
To create a new site and to view a list of sites that you own or can edit:
새로운 사이트를 작성하거나 이미 만들어진 사이트를 편집하기 위해서는
- Directly visit the page
직접 아래의 URL을 입력해서 페이지 방문
Enter https://sites.google.com/a/<<YOURDOMAIN>> into your browser. <<create link>>
<<YOURDOMAIN>> 부분은 회사 도메인으로 변경(예:sbctech.net)
- Or, visit from another Google Apps product
또는, 다른 구글앱스 제품으로부터 방문
When you're using a Google Apps product (e.g. Mail, Calendar), you'll see other Apps products listed at the top left of the page. Simply click Sites to access your sites list.
구글앱스 제품을 사용할때(예: 메일, 캘린더), 아래의 이미지와 같이 페이지의 왼쪽 상단에 다른 Apps 제품을 볼 수 있습니다. 해당 링크를 클릭하면 간단히 사이트 리스트에 접속 할 수 있습니다.

Create your site
사이트 작성
Once you've accessed your sites, click the Create new site button to begin the process.
사이트에 접속한 뒤 시작 단계로 “새사이트 만들기” 버튼을 클릭합니다.

Next, you'll need to provide the following details (other information is optional, but these are required):
다음, 아래와 같이 세부정보를 입력해야합니다( 다른 정보는 옵션이지만 아래 사이트 url 주소는 필수 입력항목입니다)Site name
사이트 이름

The name you select will autofill as the custom URL for your site. If you'd like a URL that differs from your site name, click into the URL field and make the appropriate changes (your title will not reflect the URL changes).
선택한 이름은 사이트 url로 자동으로 만들어 질 것입니다. 만약 url을 변경하고 싶으면 URL 항목을 선택한 다음 적당한 URL로 변경합니다(이때 URL을 변경해도 제목은 변경되지 않습니다)
Access level
접근단계

You control who can view your site. Remember, if you make your site public, anyone in the world will be able to view your site. Choose with care!
사이트에 접속할 수 있는 사람을 제어할 수 있습니다. 만약 사이트를 공개로 설정하면 전세계 누구나 사이트를 조회할 수 있습니다. 이 부분은 사이트의 용도에 따라 조심해서 공유 설정을 하여야 합니다.
* Domain administrators control whether it's possible to make sites available to the public. Check with your domain administrator if you're not able to view this sharing option.
도메인 관리자는 사이트 공개여부를 설정할수 있습니다. 만약 이 공유설정 옵션이 작동되지 않으면 도메인 관리자에게 설정을 확인하여야 합니다.
Theme
테마
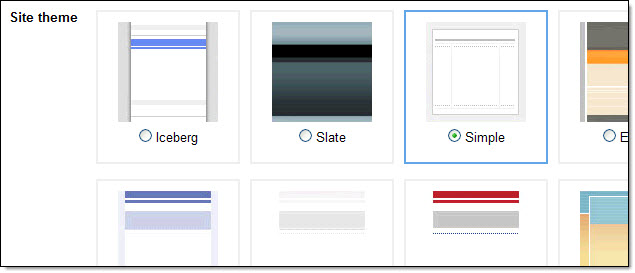
Themes determine the overall look of your site - from standard solids to whimsical backgrounds, you can be your own site designer with one click of the mouse! If you're not entirely happy with the colors or fonts in a certain theme, don't worry, you'll be able to customize colors and fonts after your site is created.
That's it! Click Create site to finish the setup process.
테마설정으로 사이트를 디자인할 수 있습니다. 단순한 모양에서 복잡한 배경까지 단순히 마우스 클릭 몇 번으로 사이트를 디자인할 수 있습니다. 만약 기본적으로 제공되는 테마의 칼라나 폰트가 마음에 들지 않는다면 사이트가 만들어진 뒤에 자신만의 커스터 마이즈된 폰트나 칼라를 적용할 수 있습니다.
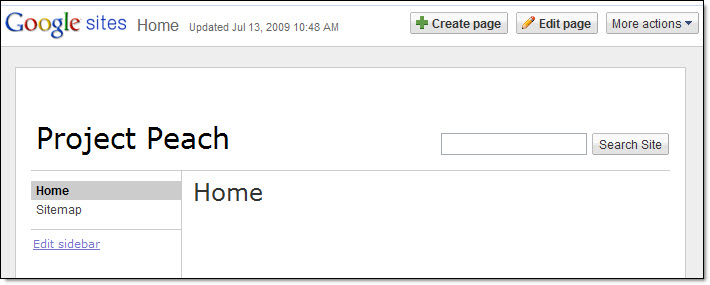
Your new site will automatically appear.
아래 그림과 같이 사이트 작성시 기본 화면 입니다
Edit pages in your site
페이지 편집
To edit a page, click the Edit Page button in the upper right corner of the page.
페이지를 편집하기 위해서, 페이지 오른쪽 상단에 있는 페이지 수정 버튼을 클릭합니다.

An edit toolbar will appear that provides the tools necessary to edit the page.
페이지를 편집하기 위한 필수도구를 제공하는 편집툴바가 보여집니다.

Add text, insert tables, and edit the layout of the page.
텍스트 추가, 테이블 삽입, 페이지 레이아웃 편집.There are also a variety of applications and gadgets available to enhance your site.
사이트를 보다 잘 꾸미기 위한 다양한 어플리케이션과 가젯이 있습니다.
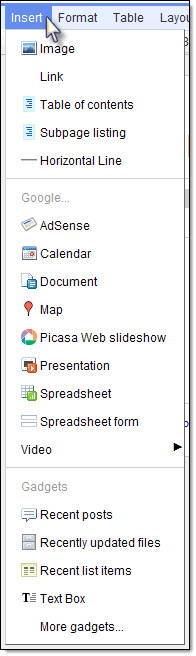
To start adding apps and gadgets to your site, select Insert, and pick the appropriate item you'd like to include.
어플리케이션(문서, 스프레드시트, 파워포인트, 캘린더, 비디오 등) 과 가젯을 사이트에 추가하기 위해서는 메뉴의 삽입을 선택한 다음 포함 시킬 적당한 아이템을 선택합니다.Some useful apps and gadgets include:
몇몇 유용한 어플리케이션과 가젯은 다음을 포함합니다.
- Calendar: Make sure your project stays on schedule and embed a calendar that includes key due dates.
캘린더 : 지속적인 프로젝트 스케쥴 관리와 마감일등을 포함하는 일정 추가
- Document/Presentation/Spreadsheet: Embed a Google Document - when the source is modified, the document is updated automatically within Sites (this is true when embedding documents, spreadsheets, forms and presentations)
문서/프리젠테이션/스프레드시트 : 구글 문서도구 포함 - 원문이 수정되었을때 사이트에 포함된 문서는 자동으로 업데이트 됩니다
- Video: Upload a video from YouTube or Google Video. Simply paste the URL, enter a title, and save.
비디오 : YouTube 또는 구글비디오로부터 비디오를 업로드 가능합니다. 단순히 URL을 붙여 놓고 제목을 입력한 다음 저장합니다.
- Map: Headed to an offsite meeting? Don't just provide directions, embed a map!
지도: 사이트에 구글맵을 추가해서 미팅장소등을 안내합니다.
- Recently updated files: Lists the latest additions/updates to your file.
최근에 업데이트된 파일 : 최근 추가되거나 업데이트된 파일 목록을 보여줍니다.
There are also more gadgets created by Google and third-party sites available by selecting More gadgets... You'll be able to preview each gadget before adding it to your site.
이밖에도 구글과 Third-party 사이트에의해 제공되는 더 많은 가젯을 가젯더보기 메뉴에서 선택할수 있습니다. 가젯을 사이트에 추가하기 전에 가젯 미리보기 기능을 이용해 확인한 후 사이트에 추가 가능합니다.Add pages to your site
사이트에 페이지추가
Add pages to better organize information in your site. The following formatting options are available, depending on the purpose of your page:
사이트에 보다 더 구조화된 정보를 위한 페이지를 추가할 수 있습니다. 아래와 같이 페이지의 목적에 따라 템플릿이 제공됩니다.
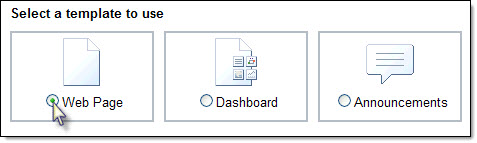
- Web Page: An unstructured page where you can add text, images, tables, and embed spreadsheets, presentation, videos and more.
Web Page: 텍스트, 이미지, 테이블, 스프레드시트, 프리젠테이션, 비디오 등을 추가할 수 있는 비정형 페이지
- Dashboard: A web page that displays an overview of information. The two-column page is pre-formatted with four gadget placeholders - click on each gadget to select the information you'd like to embed (e.g. calendar, document, presentation, etc.)
대시보드: 정보의 전반적인 개요를 보여주는 웹페이지로서 2 컬럼에 4개의 가젯을 추가할 수 있습니다.(예: 캘린더, 문서, 프리젠테이션 등등)
- Announcements: An easy way to post chronological information (e.g. project updates, company announcements, etc.)
공지사항: 시간별 정보를 쉽게 올릴 수 있습니다(예: 프로젝트 업데이트, 회사 공지사항)

- File Cabinet: Allows you to organize common documents in one place. Upload files from your hard drive and create a complete library of information.
파일 캐비넷 : 한 곳에 공유할 문서를 모아 놓을 수 있습니다. 하드 드라이브로 부터 파일을 업로드 하거나 자료실을 작성할 수 있습니다.
- List: Choose from list templates, or configure your own custom columns to easily track items.
리스트: 제공되는 리스트 템플릿을 선택하거나 자신만의 맞춤형으로 쉽게 항목을 추적할 수 있도록 환경설정할 수 있습니다.
- Start Page: A web page with a special section that is restricted to each individual collaborator. Collaborators can still add content that everyone will see, but can add their own personalized set of gadgets that only they can view.
시작페이지 : 개별적인 협업을 위한 자신만의 특별한 포탈을 구성. 협업자들은 누구나 조회할 수 있는 내용을 추가할 수 있으며 오직 개인만 볼수있는 개별 가젯도 추가할 수 있습니다.
Share your site
사이트 공유
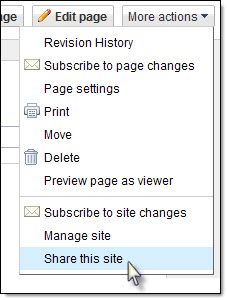
Now that you've created your site, share and collaborate with others! Click More actions in the top right of any page and select Share this site.
지금 작성된 사이트를 다른사람과 공유할 수 있습니다. 페이지의 상단 오른쪽의 작업 선택의 사이트 공유를 클릭합니다.
As the site owner, you can control who can edit and view your site by adding others as owners, collaborators, or viewers.
사이트 소유자로서 누가 편집을 하고, 사이트를 볼 수있는지 공유자를 추가할 수 있습니다.
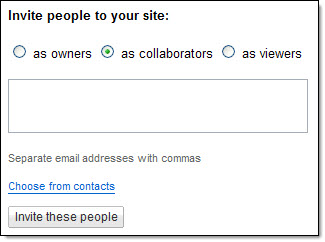
- Viewers can only view the content on your site (they won't be able to make changes or invite others to view your site). Remember, if you make your site available to your entire domain, you do not
need to send invitations for specific people to view it.
조회자는 오직 사이트의 내용을 볼 수만 있습니다. (조회자는 변경이 불가하고 다른 사용자를 초대할 수 없습니다) 만약 전체 도메인에 있는 사용자가 볼수 있는 사이트를 만든다면 사이트를 볼수있는 특별한 사용자를 초대할 필요가 없습니다.
- Collaborators can create, edit, organize and delete pages.
협업자는 사이트를 작성, 편집, 삭제할 수 있습니다.
- Owners can do everything a collaborator can do, PLUS edit themes/layout, delete the site, and invite other owners, collaborators or viewers.
소유자는 협업자가 할수 있는 모든 것을 할 수 있으며 추가적으로 테마/레이아웃을 수정하고 사이트를 삭제하고 다른 소유자나 협업자, 조회자들을 초대할 수 있습니다.
1 comment:
잘 보았습니다.
궁금한 점은 Sites 하단에 power by google 라 나오는 점은 어떻게 지우나요?
Post a Comment